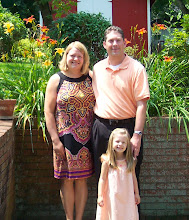
Grace’s much-anticipated first day of kindergarten finally arrived! We have been literally counting down the days, marking them off our wall calendar. I really had NO idea what to expect the first day, but it was great! When we wrapped things up before lunch, she grabbed my arm and said, “Mommy, can we do this every day? Please?” Mission accomplished.
I know it won’t be sunshine and roses all the time. There will be challenges. We had a small one today. But, I can already tell homeschool is going to be a wonderful experience for us both. I am so thankful to be ABLE to do this. I am so thankful for a husband who WANTS me to do this. I am so thankful for a daughter who BEGS me to do this. I am so thankful.
Many of you have asked what our typical day looks like. We’ve only just started, and I’m sure it will evolve as we work out the kinks, but I’ll share what has worked for us so far.
I get up at 7:00 and exercise for about 45 minutes. Grace usually wakes up between 7:30-8:00. We eat breakfast and get dressed/ready for the day. Grace meets me in the schoolroom to start at 9:00. I like to start with Bible time. We work through a simple devotional together. Next I like to practice memory work with catechism and Bible verses. We finish with a short prayer time, asking God to bless our learning.
Next we have our calendar time where we learn the current day, date, year, etc. We check the weather and record the forecast. We post our letter, number, shape, and color of the day. We keep track of how many days we have been in school, learning place value. Calendar time takes about 10 minutes.
Next we move to phonics. The curriculum I’m using has daily lessons with corresponding activities and worksheets. We’ve been spending about 45 minutes on these lessons. It’s a lot of oral practice and auditory learning. I save the writing component for later.
Next we change gears and do math activities. The curriculum is very hands-on, using manipulatives and games. This is a great way to break up the more stressful phonics/language arts activities. Math is Grace’s favorite part of the day!
Now that she’s had a break with math, we go back to writing. We use dry erase boards and worksheets to practice the letters we have learned.
Since writing can sometimes be frustrating for her, I like to move into a fun craft activity next. I try to mix it up and use different materials every day.
We end our school day by reading books together for a while. Sometimes we might play an educational game.
All together, our kindergarten day takes 2 1/2 - 3 hours. We finish before lunch!
I love that we have our afternoons free to do other things. Yesterday we attended orientation for her new ballet class, which begins next week. Today we went to the science museum and played for a couple of hours.
I’m very happy with our schedule and I’m excited to see what this year has in store for both of us!